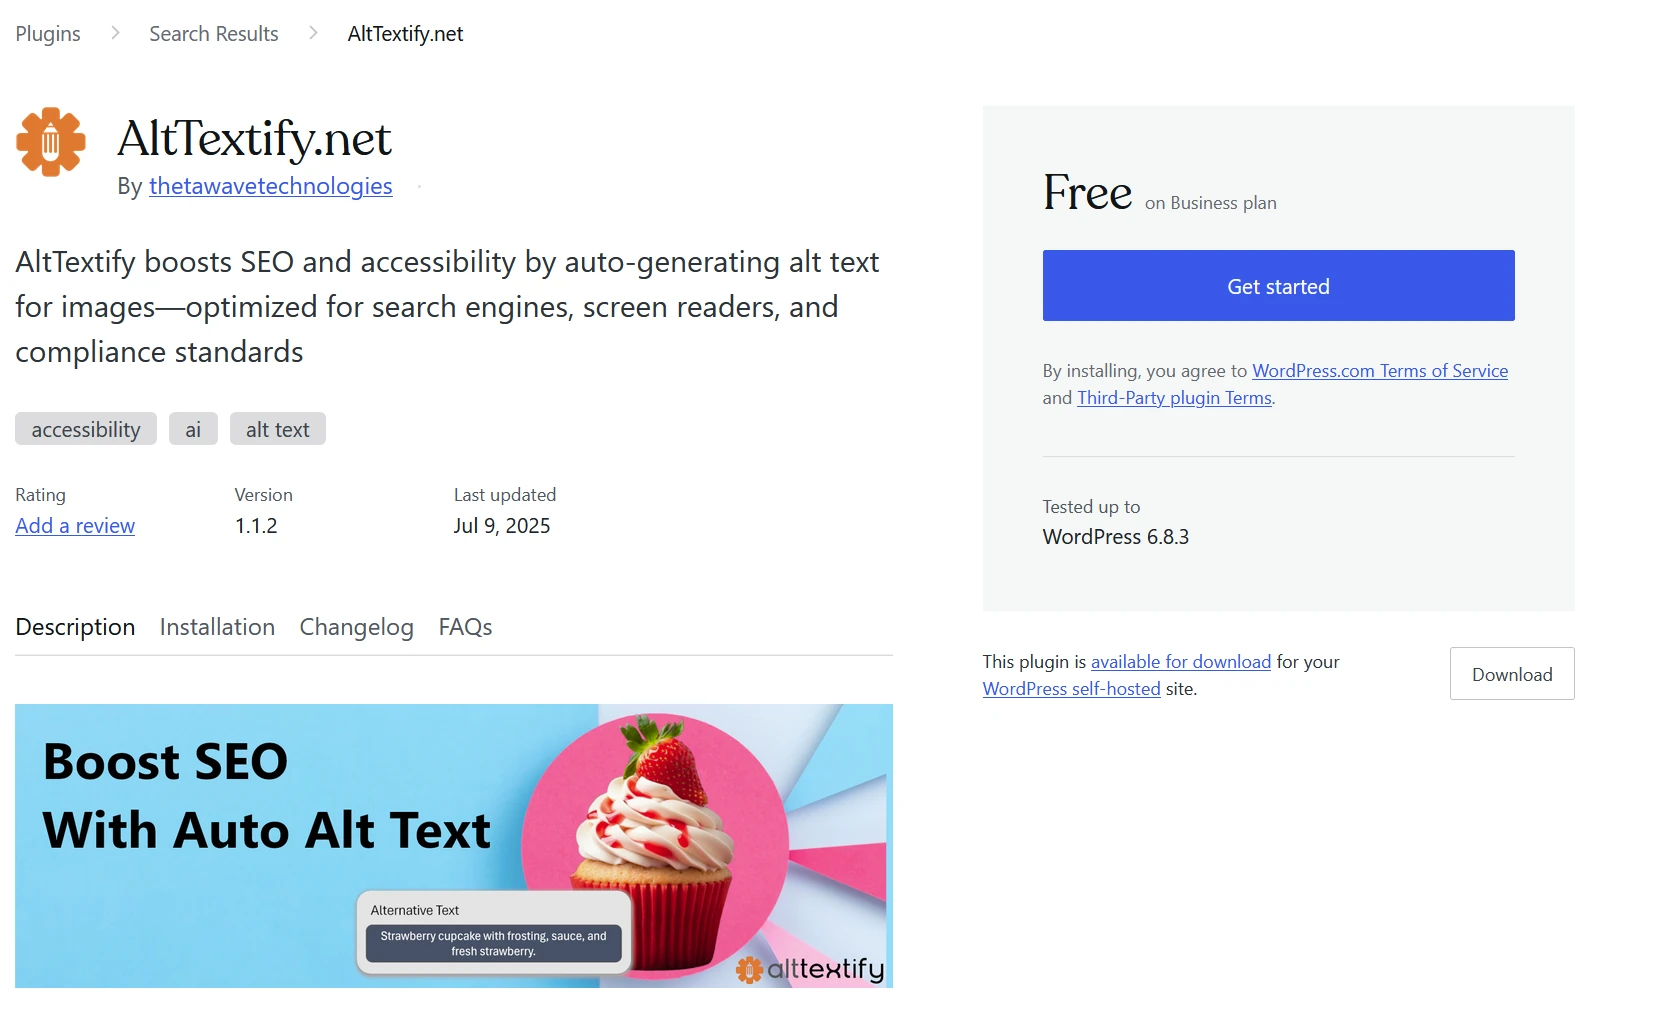
WordPress / WooCommerce Plugin
The AltTextify WordPress plugin makes it effortless to generate high-quality alt text for every image as you create posts or pages — automatically. With the plugin installed, you'll never have to manually write or manage alt text again.
Installation
You can install the plugin directly from your WordPress dashboard:
- Navigate to Plugins → Add New.
- Search for AltTextify.
- Click Install Now, then Activate to enable it on your site.
Alternatively, you can download it directly from the official WordPress Plugin Directory:
👉 https://wordpress.com/plugins/alttextify-ai-alt-text
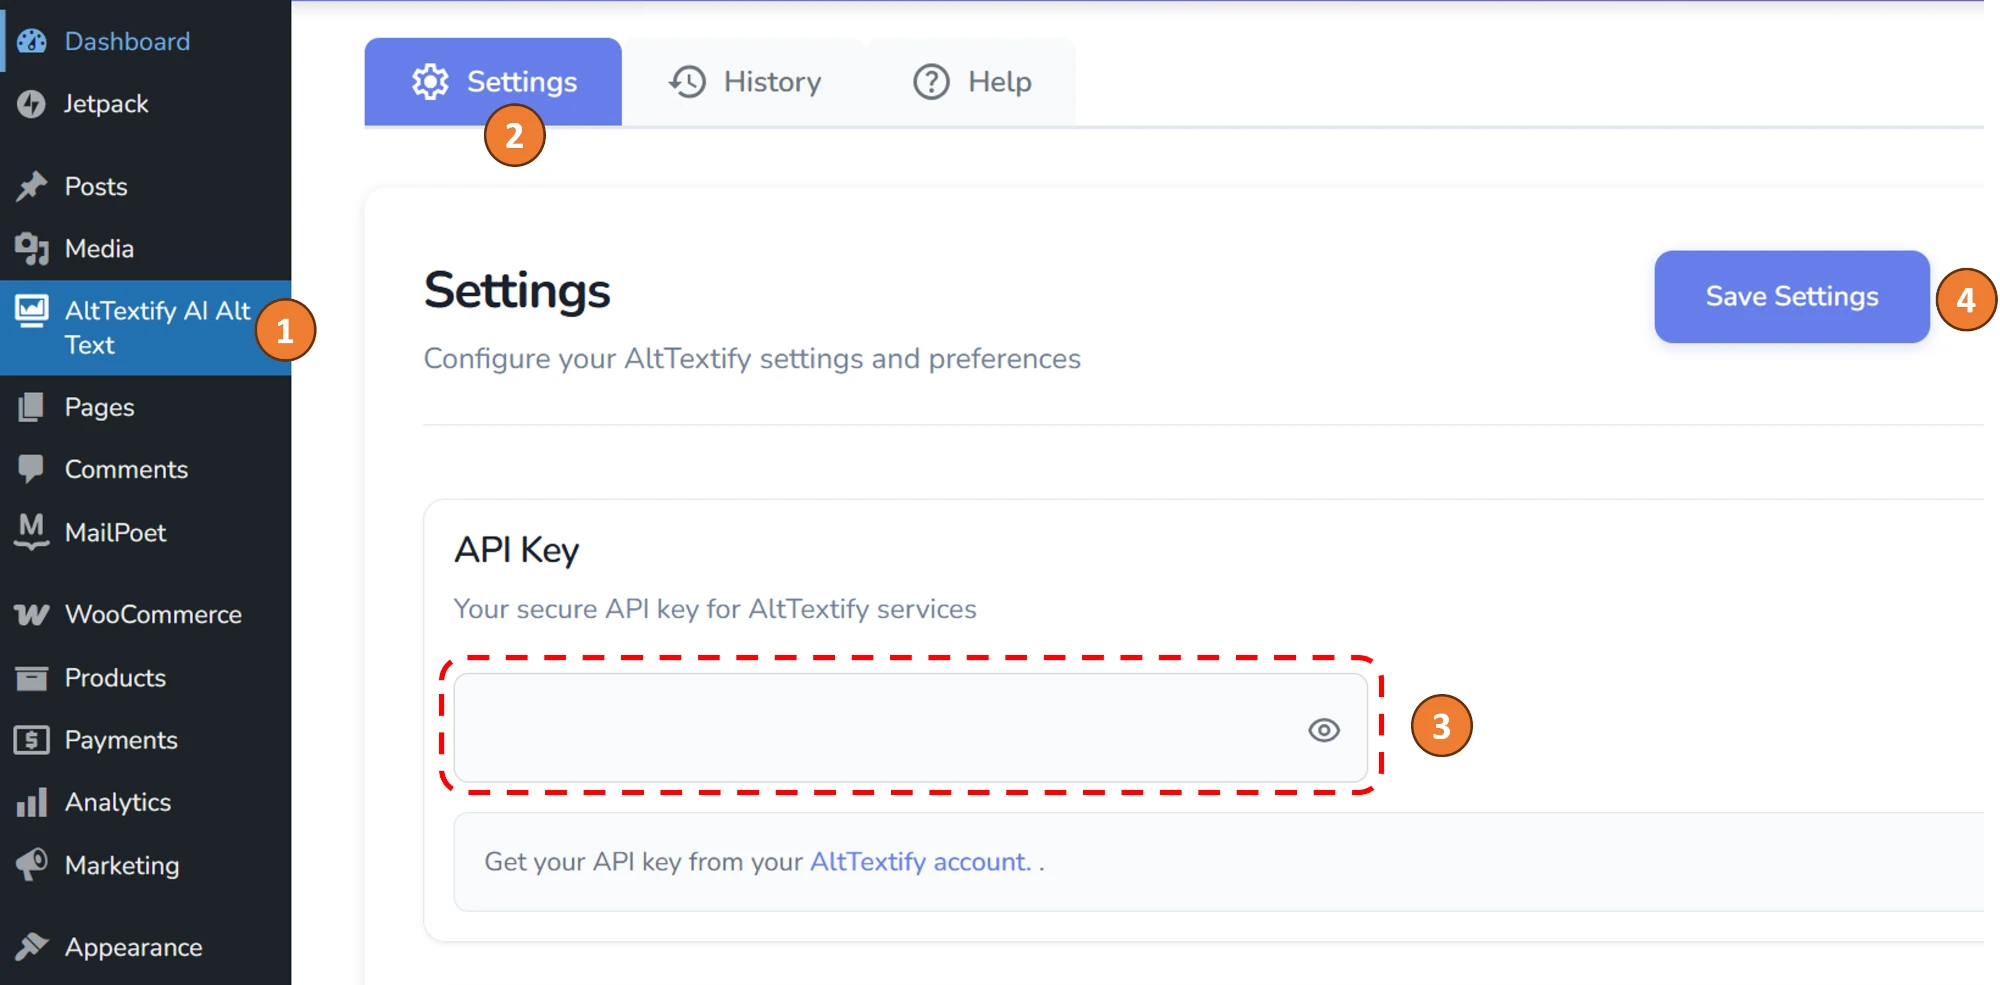
API Key Setup
Connecting your plugin to your AltTextify account takes just a minute.
- Log in to your AltTextify dashboard.
- Go to Account → API Keys.
- Copy an existing API key or create a new one.
- In your WordPress admin, open the AltTextify Plugin Settings page and paste your API key.
Once connected, the plugin will automatically generate and apply AI-powered alt text for your images in WordPress and WooCommerce — seamlessly and instantly.
How It Works
The AltTextify WordPress Plugin operates automatically in the background, ensuring your images always include optimized, AI-generated alt text — without any manual effort.
By default, the plugin automatically generates alt text for every new image uploaded to your WordPress site. It also integrates with popular SEO plugins to include relevant keywords, helping improve both accessibility and search visibility.
If you’d like to customize how the plugin behaves, navigate to the AltTextify Settings page in your WordPress admin panel. From there, you can fine-tune specific options, such as when and how alt text is generated.
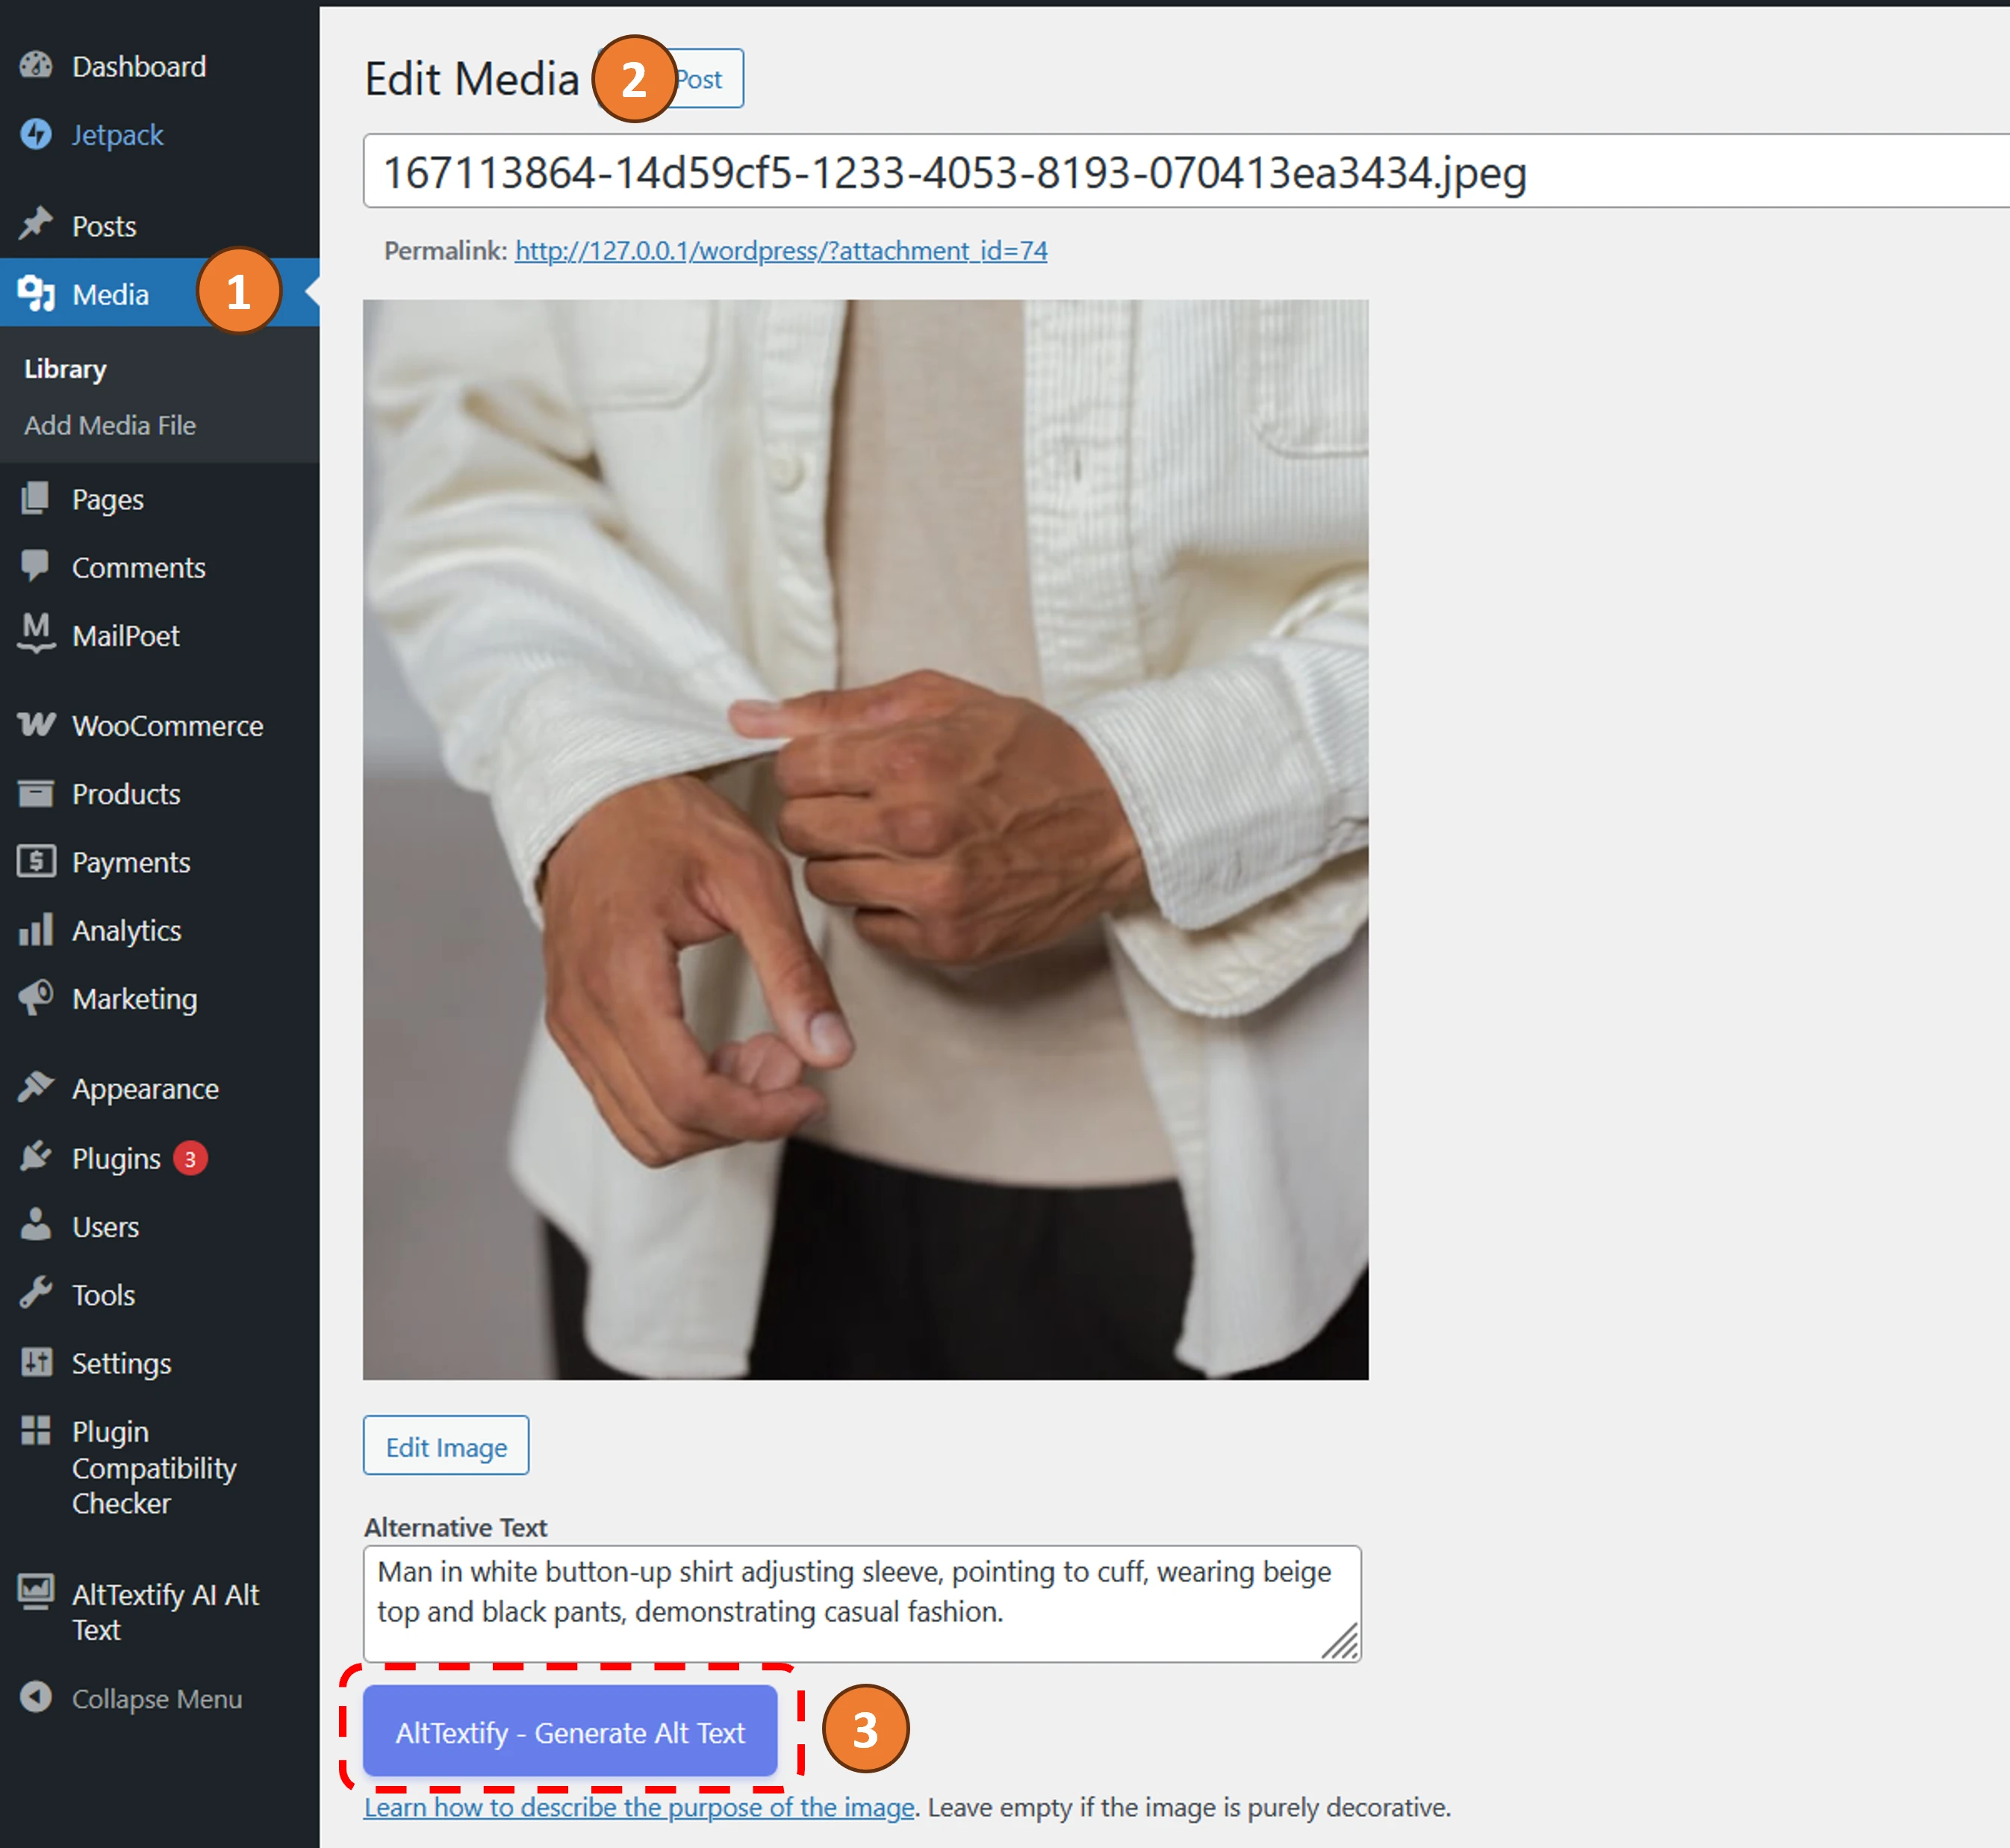
Update Single Image
- Open the Media Library
- Click on any image to open its details
- Look for the "Generate Alt Text" button in the image details
- Click the button to generate alt text for that specific image
- Review and edit the generated alt text if needed
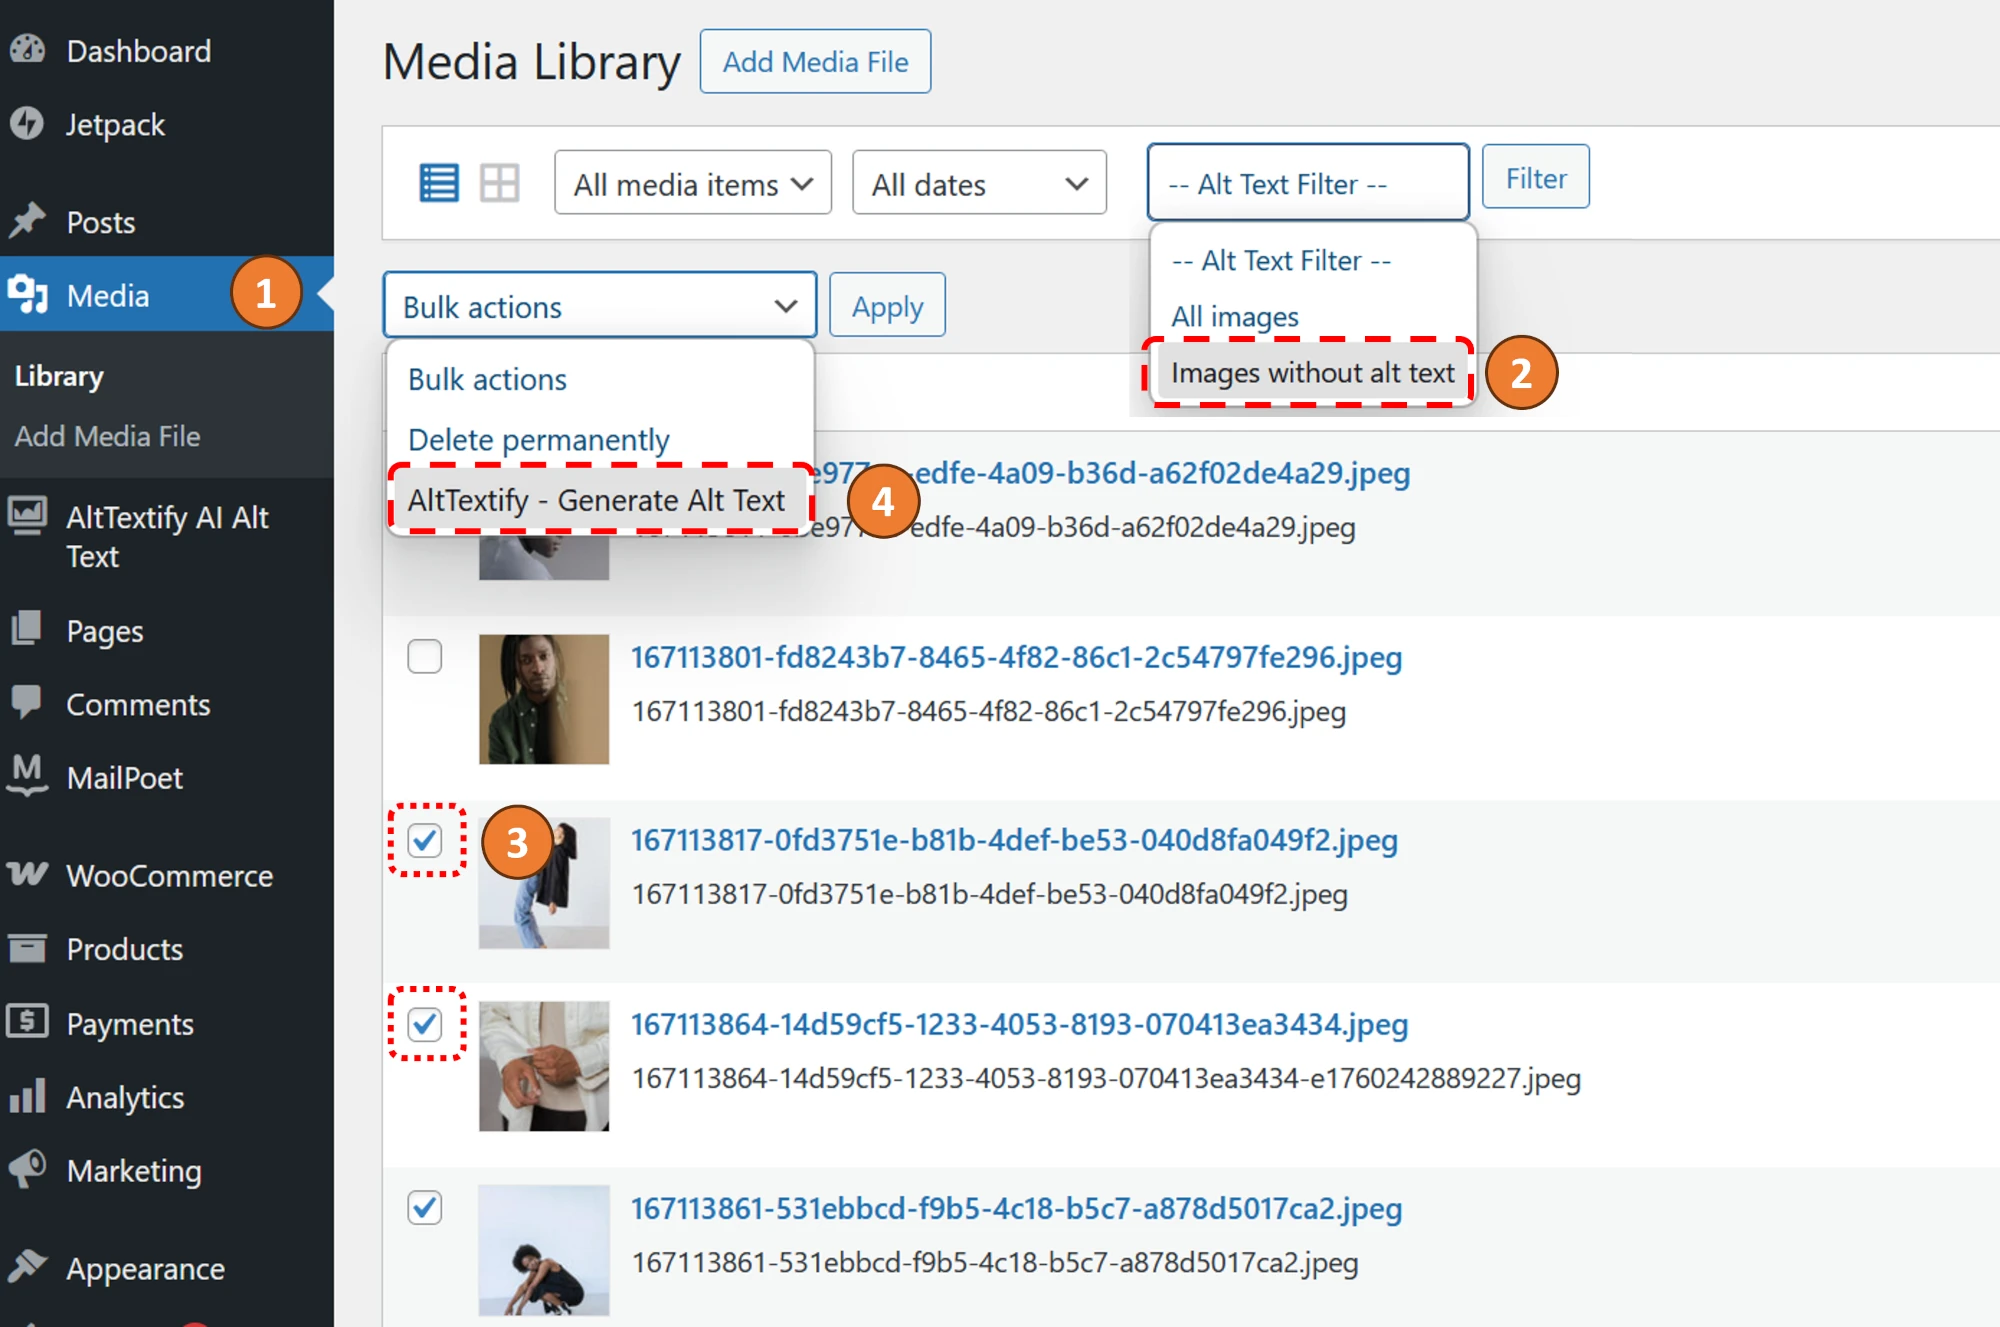
Update Multiple Images in Media Library
- Go to Media Library in WordPress
- Apply filter "Images without alt text"
- Select multiple images using checkboxes
- Choose "AltTextify - Generate Alt Text" from the bulk actions dropdown
- Click "Apply" to process all selected images
- Monitor the progress in the notifications area
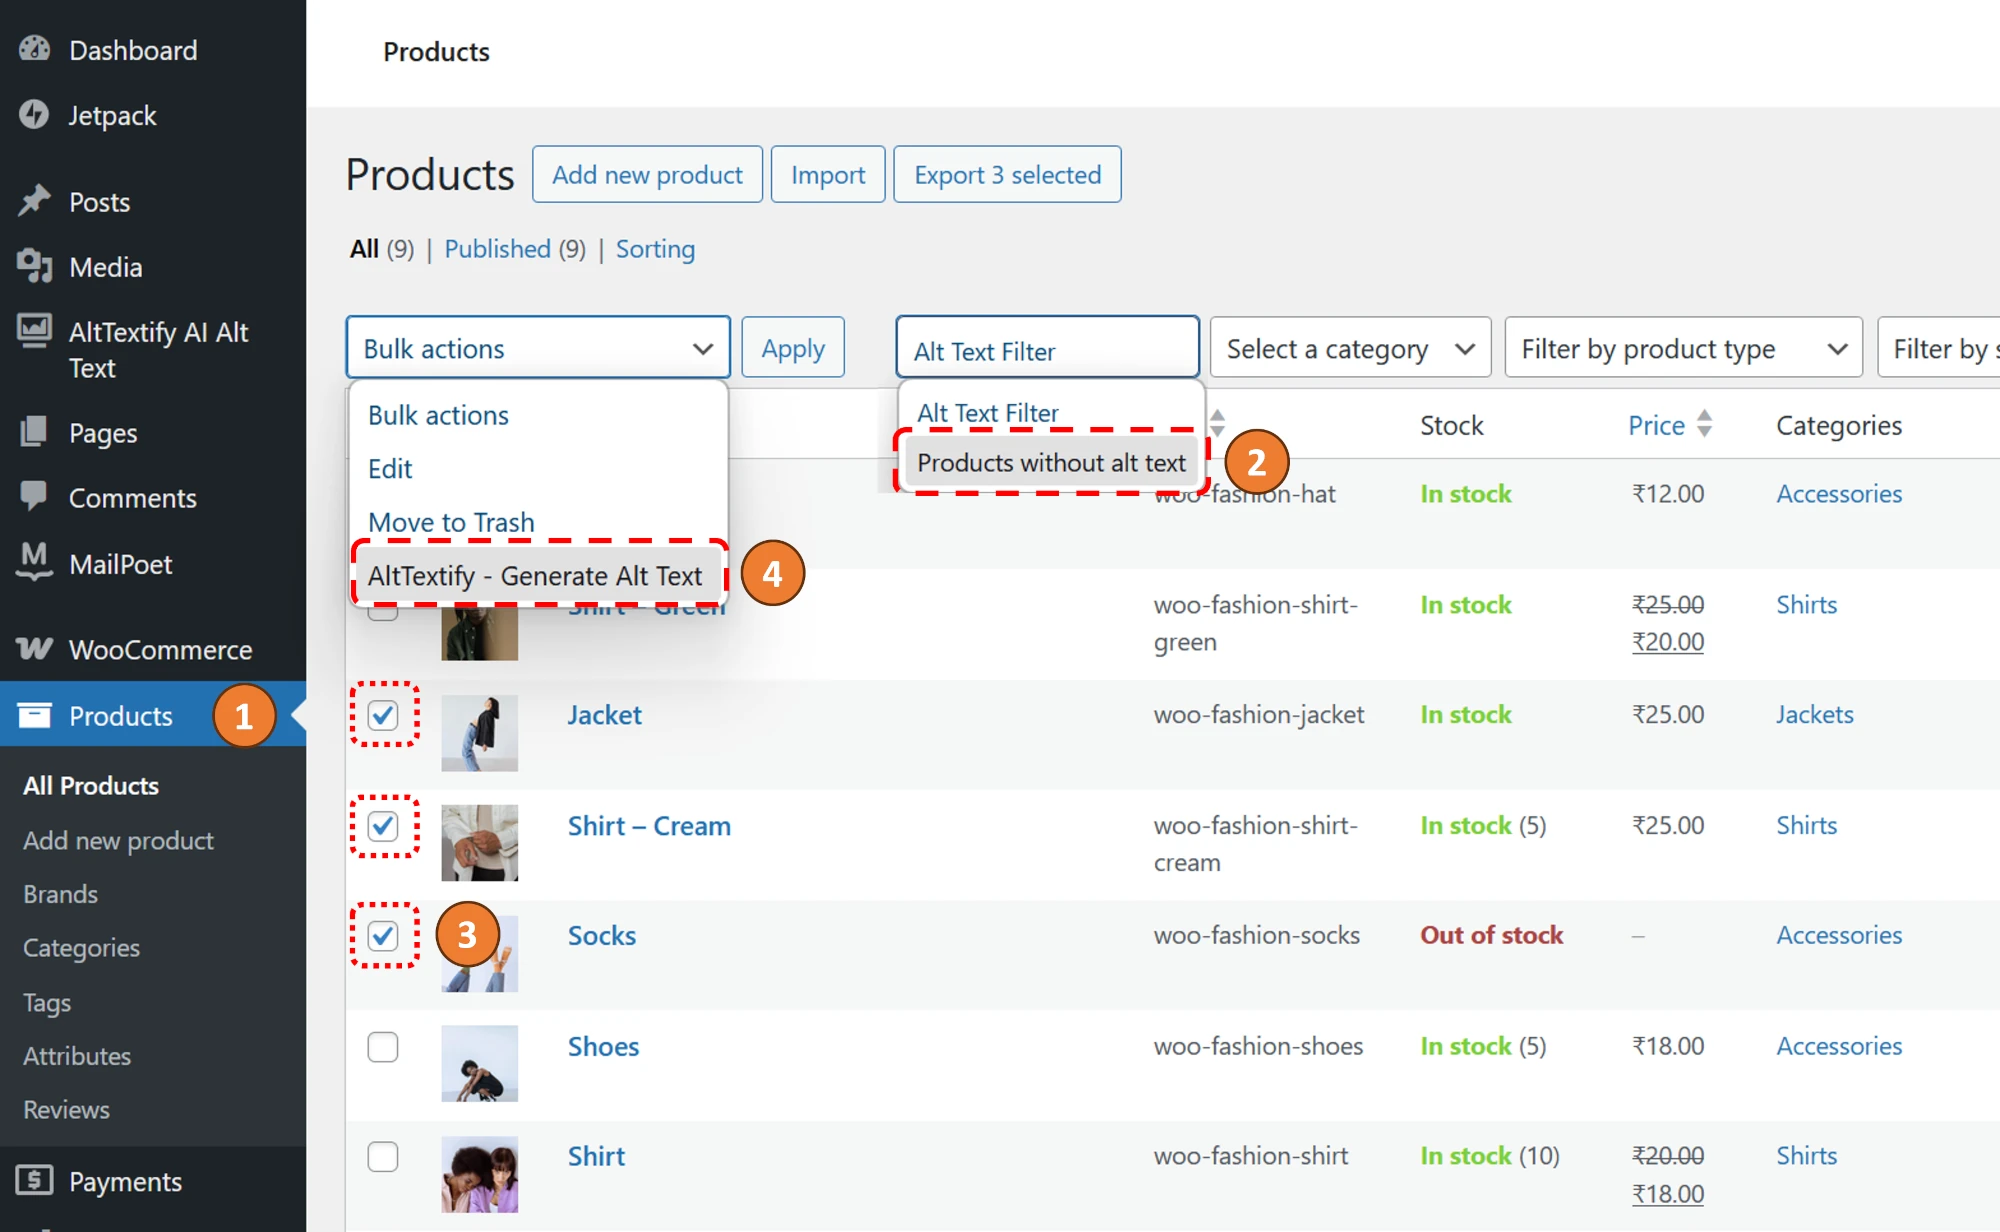
Update Multiple Images in Products (WooCommerce)
- Go to Products under WooCommerce
- Apply filter "Products without alt text"
- Select multiple images using checkboxes
- Choose "AltTextify - Generate Alt Text" from the bulk actions dropdown
- Click "Apply" to process all selected images
- Monitor the progress in the notifications area
Updating Posts and Pages
By default, WordPress assigns image alt text from the Media Library at the time an image is inserted into a post or page. This means that if you later update an image’s alt text in the Media Library, existing posts or pages using that image will not automatically reflect the change.
The AltTextify WordPress Plugin provides an easy way to keep your content synchronized. You can refresh the alt text in posts, pages, and WooCommerce products to match the most recent alt text stored in the Media Library. This can be done individually or in bulk.
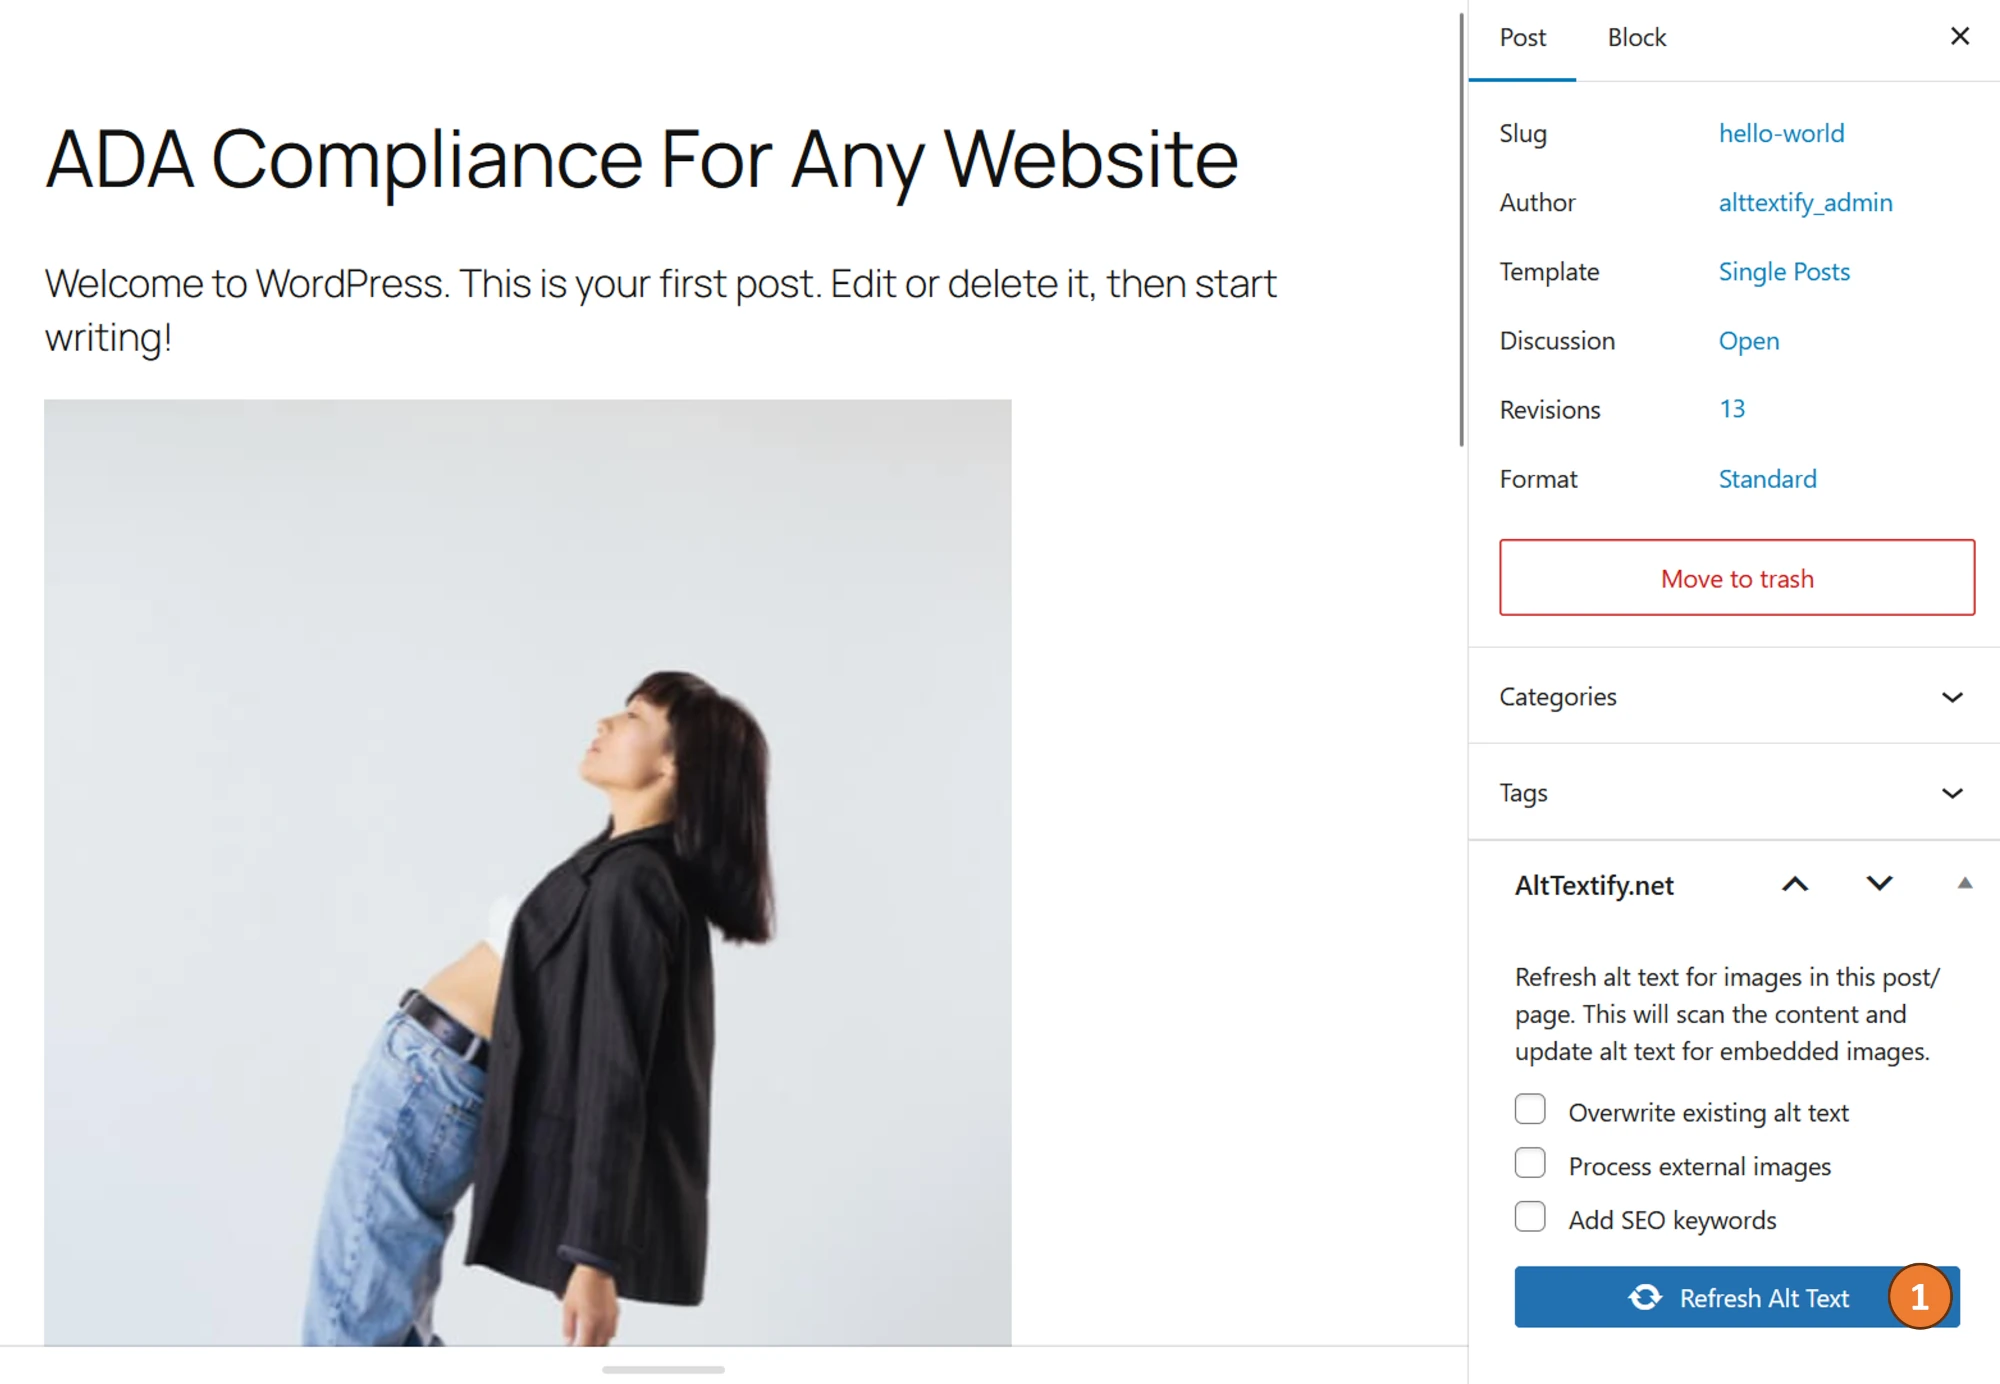
Refreshing a Single Post or Page
- Open the desired post or page in Edit mode.
- In the sidebar, click the “Refresh Alt Text” button.
- The plugin will automatically update all images within that post or page using the latest alt text from your Media Library.
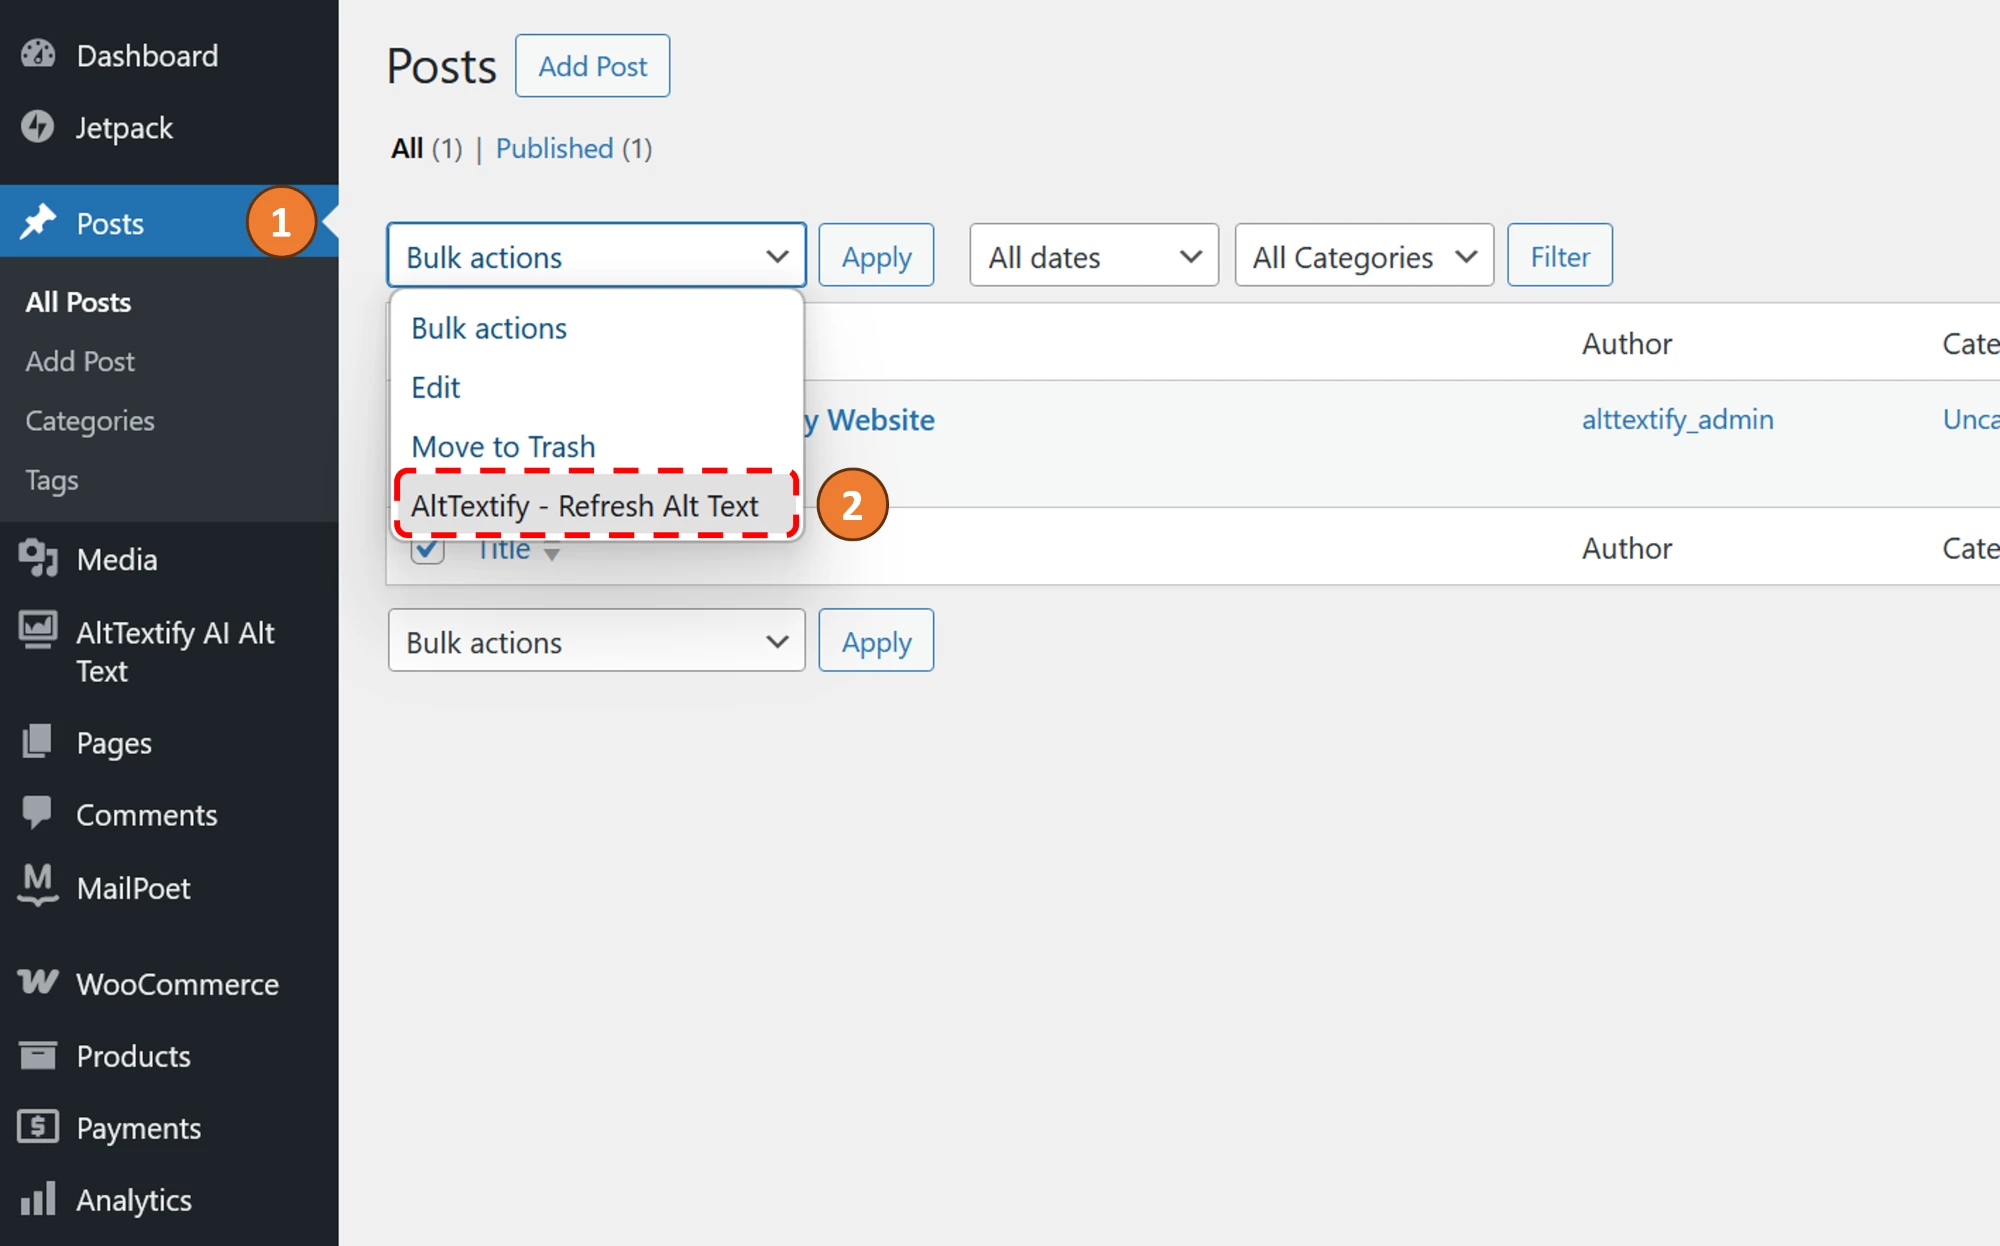
Refreshing Multiple Posts or Pages
- From your WordPress dashboard, open the Posts or Pages list view.
- Select the checkboxes next to the items you’d like to update.
- From the Bulk Actions dropdown, choose “Refresh Alt Text.”
- Click Apply to update the selected posts or pages.
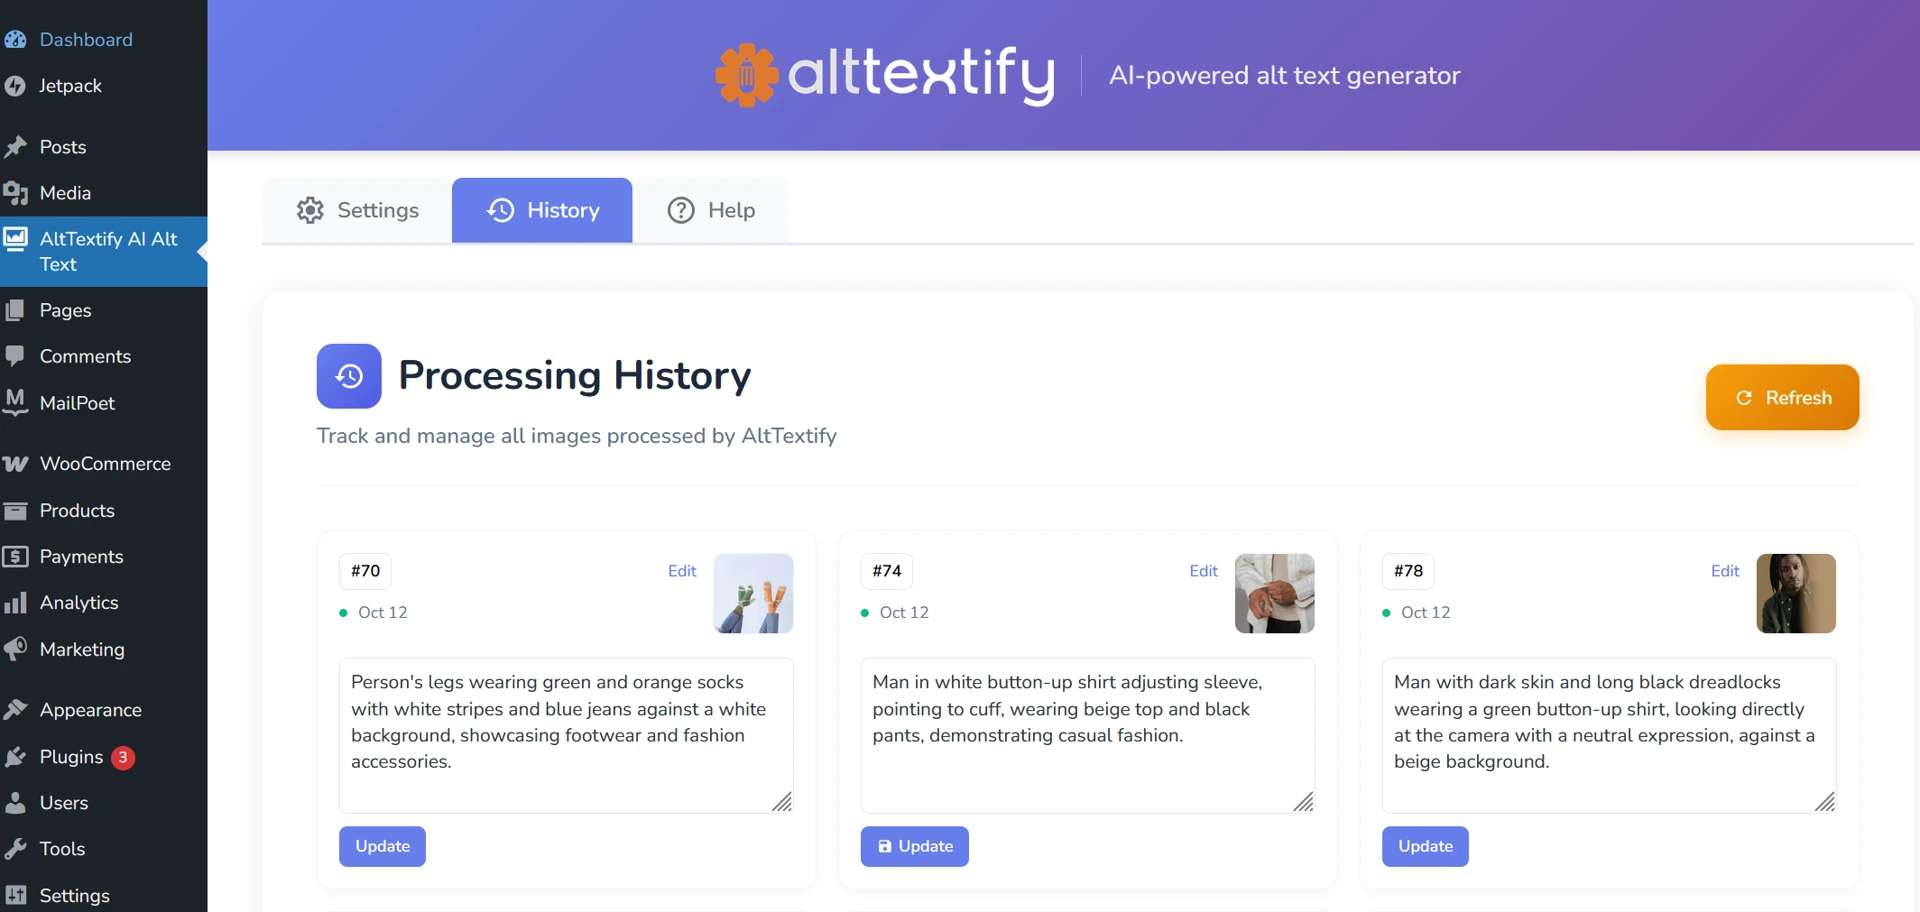
Reviewing Processed Images
The History page provides a complete overview of all images in your WordPress Media Library that have been processed by the AltTextify Plugin, along with their currently generated alt text.
By default, the list is sorted with the most recently processed images at the top, allowing you to easily see which items were updated last.
If you wish to refine or adjust any alt text, you can edit it directly on the History page. After making changes, simply click Update — your revised alt text will be immediately saved back to the corresponding image in the Media Library.
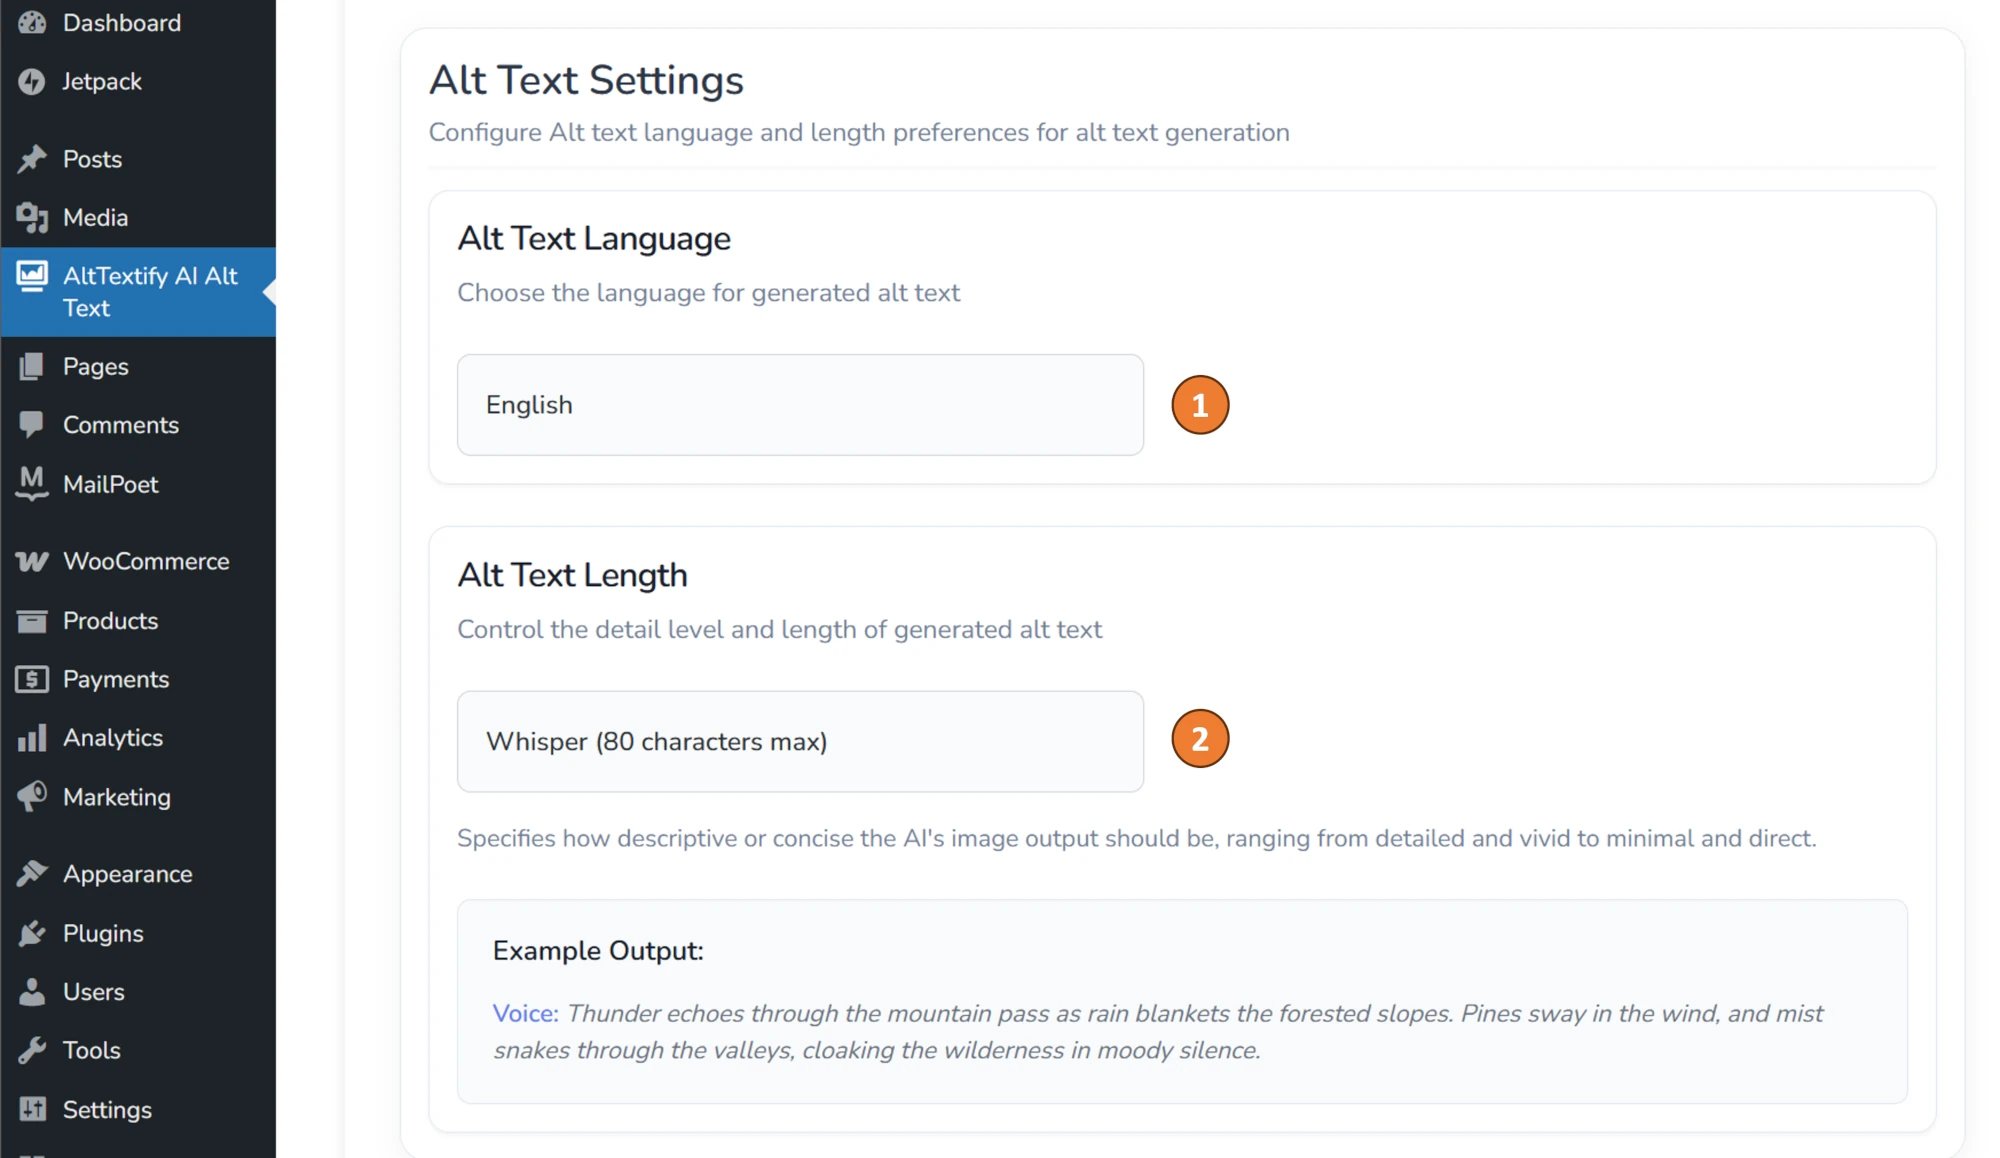
Alt Text Settings
- Language: Generate alt text in over 140 supported languages.
- Alt Text Length: Choose the tone and level of detail for your AI-generated alt text — options include
- Murmur (80 characters max)
- Whisper(120 characters max)
- voice(200 characters max)
- echo(250 characters max)
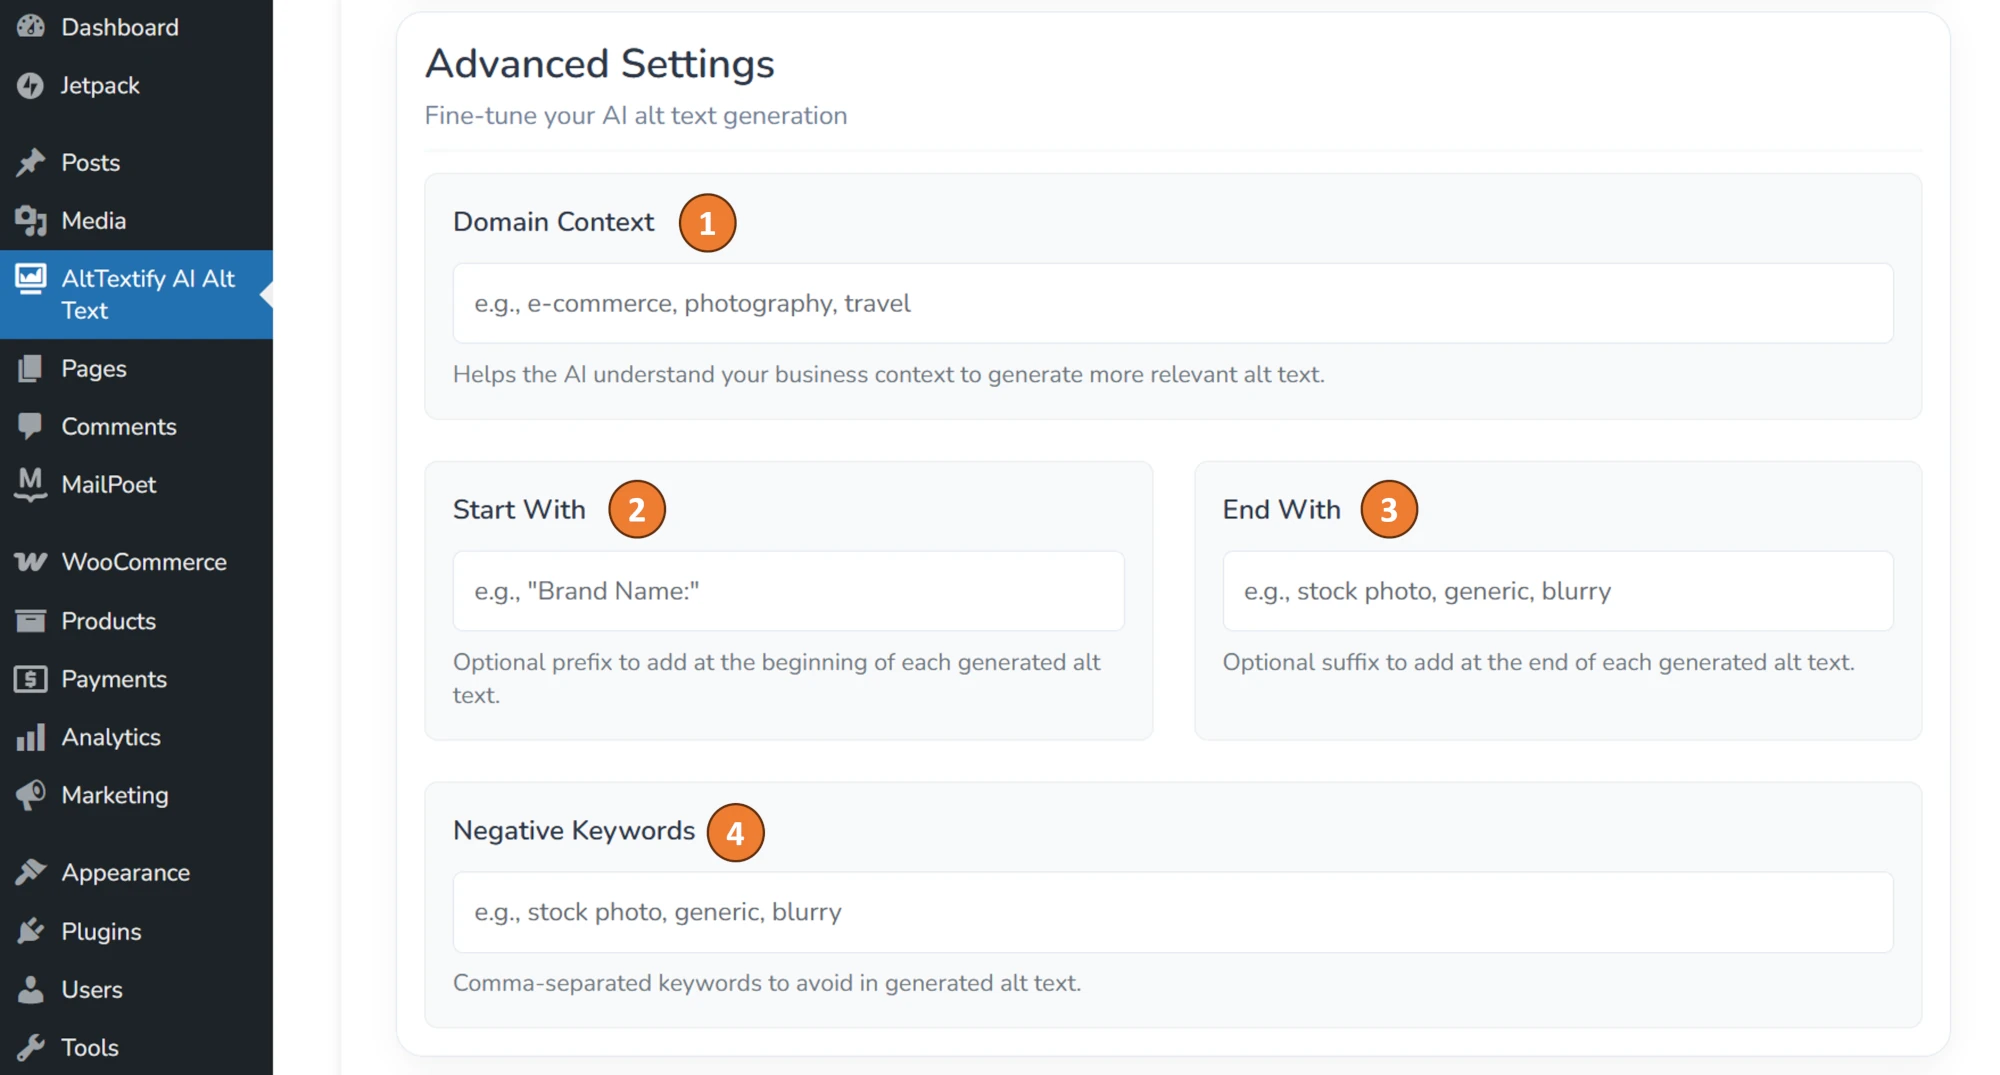
Advanced Properties
The Advanced Properties option allows you to specify additional parameters for the alt text generation process.
- Domain Context: Add your domain name to ensure the generated alt text is relevant to your website.
- Start with: Text to prepend to all generated alt text
- End with: Text to append to all generated alt text
- Negative Keywords: List of negative keywords/phrases to be removed from any generated alt text. Negative keywords must be in English, even if requesting alt text in another language.
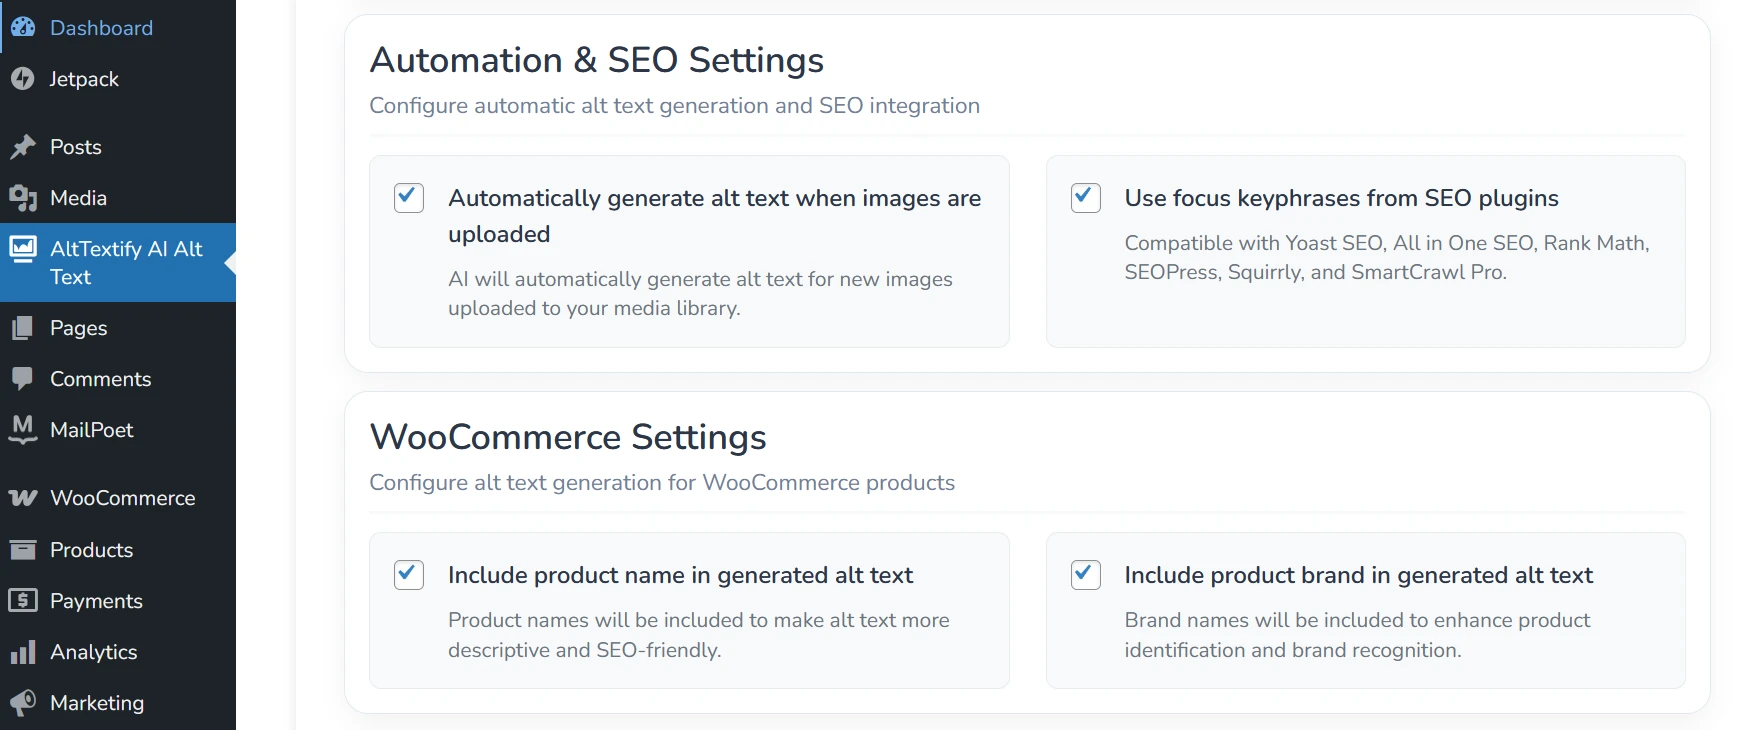
SEO & WooCommerce settings
SEO Integration
Enhance your alt text generation by integrating with leading SEO plugins such as Yoast SEO, RankMath, All in One SEO (AIOSEO), SEOPress, The SEO Framework, and SmartCrawl Pro.
When enabled, AltTextify automatically includes your post’s focus keywords within the generated alt text, helping improve both accessibility and search relevance.
If no focus keyword is available, the plugin can optionally use the post title as a fallback keyword source.
Supported SEO Integrations
- ✅ Yoast SEO (including Premium)
- ✅ RankMath
- ✅ All in One SEO (AIOSEO)
- ✅ The SEO Framework
- ✅ SEOPress
- ✅ SmartCrawl Pro
WooCommerce settings
If your site uses WooCommerce, enable these options to automatically include product names in generated alt text, enhancing both accessibility and SEO performance.